Remove and Reinstall Solar Panels for Roof Replacement
Remove and Reinstall Solar Panels for Roof Replacement is a process that goes beyond simply lifting panels off and putting them back. It involves inspections, permits, new single-use attachment hardware, temporary weather sealing, safe on-site storage, licensed electrical reconnection, and careful coordination with your roofer to protect both your new roof and your solar investment.
Why Detach & Reset Matters During a Roof Replacement
When you replace a roof, every layer that protects your home must be removed and rebuilt correctly. Because solar panels mount directly to the roof structure, they must be detached to allow your roofer full access. Working “around” panels invites leaks, voids warranties, and can lead to uneven or compromised roofing surfaces later. A planned detach and reset preserves system performance, keeps warranties intact, and helps you pass any required inspections.
Pre-Removal Inspection: Document the System’s Health
A certified solar professional should test and document system functionality before anything comes off the roof. This includes checking individual panels, connectors, homeruns, junction boxes, racking condition, optimizers or microinverters (if applicable), and inverter logs. Pre-removal documentation protects you and your contractor by clearly distinguishing pre-existing issues from any concerns addressed during reinstallation.
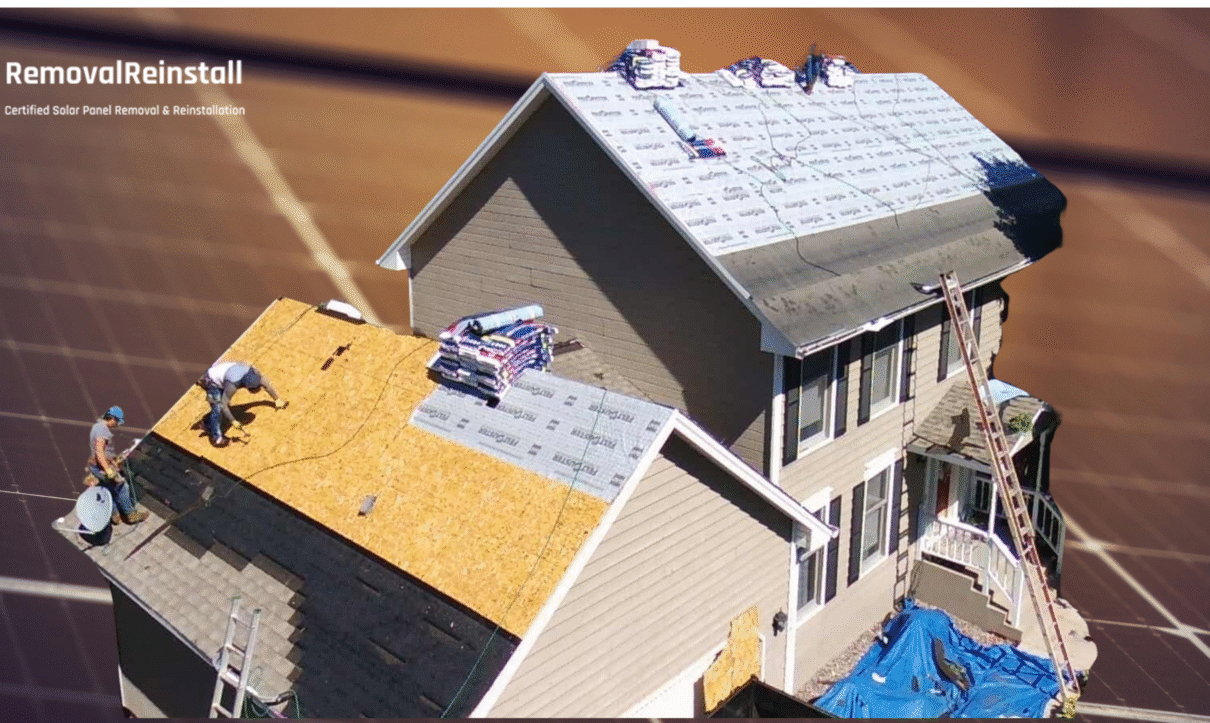
Temporary Sealing of Roof Penetrations
Once racking and attachments are removed, there will be penetrations in the roof deck. Professional crews apply temporary seals to help prevent water intrusion while your roofing work is underway. This sealing is a short-term safeguard; it does not fix prior issues or storm damage, but it buys you protection during the construction window until your new roofing system is installed and properly flashed.
Safe On-Site Storage of Solar Panels
Panels should be removed and stored carefully on your property—commonly in a garage or a low-traffic area of the yard. The goal is to avoid broken glass, damaged frames, compromised connectors, or microinverter/optimizer harm. A clean, dry, and designated space reduces handling risk and keeps your job moving without delays.
New Attachment Hardware Is Required (Single-Use Components)
All roof attachment hardware used to mount the racking system—flashing, roof attachments, lag bolts, and the associated sealing components—must be replaced with new, manufacturer-approved parts during reinstallation. These components are considered single-use for critical reasons:
- Safety: Reused flashing and seals cannot guarantee watertight performance.
- Warranty Compliance: Roofing and solar manufacturers routinely require new hardware to maintain warranties.
- Roof Integrity: Reusing penetrative hardware increases leak risk and can compromise the roofing system.
Reinstallation estimates should explicitly include new hardware so your roof warranty and system warranties remain protected.
Roof Types and Mounting Systems Affect Complexity
Your roof type shapes labor needs, staging, and reattachment details:
- Asphalt Shingle: Typically the most straightforward detach and reset. Rail-based systems are common and efficient to work with.
- Tile: More labor-intensive. Tiles must be removed and replaced carefully; specialty mounts and sub-flashing are often required.
- Metal: Two primary scenarios. Standing seam often uses non-penetrating clamps; screw-down metal typically requires penetrations and careful flashing.
These differences influence scheduling, attachment selection, and overall project cost. Exact pricing should always be tailored to your system size and roof construction.
Timing & Coordination With Your Roofer
- Detach and Temporary Seal: Solar crew removes panels, racks, and attachments; seals penetrations.
- Roof Replacement: Roofing crew installs the new roofing system, flashing, and underlayment.
- Reinstall and Reconnect: Solar crew returns to install new single-use hardware, re-mount racking and panels, and complete electrical.
- Inspections/Utility: Where required, final inspections and utility sign-offs are completed before system activation.
Good communication prevents long solar downtimes and reduces exposure risks. Choose teams who plan the calendar together and understand each other’s scopes.
Permits and Engineering Plans
Local rules vary. Some jurisdictions allow re-use of the original engineering plans; others require updated drawings or new permit submittals. If you have copies of your original stamped plans, share them with your contractor. If not, your contractor can obtain or produce them for an additional fee. Permit costs and review timelines are not uniform—this is a major reason quotes remain ranges rather than fixed numbers until jurisdictional requirements are confirmed.
For a helpful overview of permitting and inspections in residential energy projects, see the U.S. Department of Energy’s Energy Saver resources.
Electrical Reconnection and Code Compliance
Reinstallation is more than carpentry. Licensed electrical professionals must verify proper polarity, grounding, bonding, labeling, conductor sizing, overcurrent protection, and rapid shutdown compliance (where applicable). Older systems may require minor updates to align with current code. Final testing confirms that strings, optimizers or microinverters, and the main inverter are operating correctly before the system is re-energized.
Protecting Your Warranties
- Roof Warranty: Many roof warranties require that solar reattachment use new, approved attachment hardware and proper flashing. Reusing older parts can void coverage.
- Solar Equipment Warranty: Manufacturers often stipulate that removal/reinstall be performed by qualified or certified professionals to maintain coverage.
- Labor Warranty: Reputable solar contractors may include a limited labor warranty (e.g., against water penetration) when new attachments are installed and scopes are followed.
Ask your contractor to list warranty terms in writing, including any conditions tied to new hardware and inspection sign-offs.
Scope Limits: PV Only, Not Pool or DHW
Detach and reset scopes typically cover photovoltaic (PV) panels only. Solar pool heaters or domestic hot water (DHW) systems are separate systems with different plumbing and performance considerations. If you have pool or DHW collectors, discuss those as their own line items so the right materials and trades are scheduled.
Upgrades, Maintenance, and Cleaning While Panels Are Off
With panels already off the roof, consider proactive improvements:
- Switch to racking that simplifies future service.
- Replace aging optimizers/microinverters where warranted.
- Add a battery if you’ve been planning energy storage.
- Have panels professionally cleaned and inspected for cracked glass, hot spots, or frame damage.
These steps are cost-effective during a detach and reset because labor and access costs are already baked into the visit.
Insurance Considerations
If your roof replacement stems from storm damage, your homeowner’s insurance may cover some or all of the solar detach and reset. Coverage varies widely by policy. Confirm in advance which items are eligible (removal, reinstallation, hardware, permits, engineering, inspections) and what documentation your insurer requires. Getting clarity early helps you plan the project timeline and cash flow.
Why Exact Pricing Varies
Quoting an exact price without a site review is impractical because real costs depend on multiple variables: number of panels, roof type (shingle, tile, metal), attachment selection, jurisdictional permit rules, need for engineering plans, wiring conditions, access and staging, storage constraints, inspection requirements, and whether insurance or upgrades are involved. Responsible contractors provide transparent ranges initially and then finalize pricing once these factors are confirmed.
Payment Timing and Project Milestones
It’s common to split payments across milestones—such as a portion at scheduling or removal crew arrival and the remainder after full reinstallation. This supports materials procurement (new attachments, consumables) and aligns final payment with successful completion and post-install testing.
Choosing the Right Contractor
- Licensed, insured, and experienced in both roofing interfaces and solar electrical work.
- Clear written scope detailing detach, storage, hardware replacement, reinstall, testing, and inspections.
- Explicit warranty language (roof, equipment, labor) and adherence to manufacturer guidance.
- Proactive scheduling with your roofer to minimize downtime and weather exposure.
- Open to upgrades and honest about what truly adds value during reinstallation.
Homeowner Checklist
- Collect and share your original engineering plans (if available).
- Decide on a clean, safe storage area on site.
- Confirm new, single-use attachment hardware is included in the scope.
- Ask how temporary sealing is handled between removal and roofing.
- Verify licensed electrical reconnection and code compliance testing.
- Clarify inspection and utility sign-off steps (if required in your area).
- Discuss optional upgrades or cleaning while panels are off the roof.
- Confirm payment milestones and warranty terms in writing.
Bottom Line
Detaching and resetting solar panels during a roof replacement is a coordinated project with many moving parts. Rather than chasing a single “price,” focus on scope quality, hardware integrity, licensed electrical work, and warranty protection. With the right plan—and the right team—you’ll end up with a watertight new roof and a fully optimized solar system that’s ready for many more years of safe, efficient production.
Request a tailored detach & reset estimate that reflects your roof type, system size, and local requirements.
U.S. Department of Energy – Energy Saver: https://www.energy.gov/energysaver