Everything Homeowners Asked About Solar Panel Removal and Reinstallation This Month
Every month, homeowners go online looking for clear information about solar panel removal and reinstallation. Most are planning a roof replacement after storm damage or age. Some are relocating and want to move their system. Others want to add batteries or expand production while the panels are already off the roof. This long guide gathers the most frequent questions from real searches and answers them in simple language so you can plan your next steps with confidence and protect your investment from start to finish.
Contents
- How the process works
- Typical timeline and scheduling
- Costs and price factors
- Insurance and storm claims
- Roof replacement coordination
- Licensing, code, and warranty protection
- Hardware, rails, clamps, and monitoring
- Roof types and what they change
- Brand specific notes for Tesla, Sunrun, and Enphase
- Relocating a system to a new home
- DIY risks and safety facts
- Batteries, inverter choices, and capacity upgrades
- Cleaning, preventive care, and production checks
- Photos, documentation, and handover package
- Working with a local team
- Frequently asked questions
- Free quote and next steps
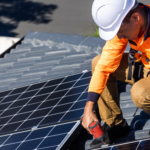
How the Solar Panel Removal and Reinstallation Process Works
The process is careful and methodical. It is not just taking panels off and putting them back. A licensed crew follows a sequence that protects your roof, your electrical equipment, your warranties, and your safety.
Step by step overview
- System shutdown and safety lockout. The crew disables the inverter and verifies zero backfeed. Labels are placed on breakers and disconnects to prevent unplanned energization. Daylight can still energize the panels so safe handling rules apply at all times.
- Mapping and labeling. The team maps every panel position, circuit, and microinverter or optimizer identifier. This ensures the same pairings return to the same location unless a layout update is planned. Accurate mapping prevents future monitoring errors and balances string voltage.
- Careful panel removal. Panels are loosened and lifted with attention to wire strain relief. Leads are capped, secured, and kept out of water channels. Junction boxes are closed. Conduit entries are protected from dust and moisture while roofing work takes place.
- Rail and base removal when required. On many reroofs you remove rails and bases. On some tile roofs you can stage rails while tiles change. The decision depends on roof scope, code, and best practice for long term water tightness.
- Roof work phase. Roofers repair decking, replace underlayment, and install the new surface. Penetration sealing surfaces are prepared for new flashing and hardware.
- Reinstallation. Bases and flashing are set to manufacturer instructions. Rails are aligned and bonded. Clamps are torqued to spec. Wiring is dressed in UV safe paths. Bonding jumpers and equipment grounding are verified.
- Commissioning and test. The team verifies voltage, inverter status, rapid shutdown function, and production. Monitoring is paired and confirmed. Photos and documentation are delivered with a clear handover.
This is the foundation of a good experience. When these fundamentals are followed, your system comes back online smoothly and performs at or above prior levels.
Typical Timeline and Scheduling
Most projects finish within one to two weeks door to door when you include roof work and any inspections. The solar portion itself is often two visits. One visit for removal and staging. One visit for reinstallation and testing. The gaps between visits depend on your roofer, weather, and city schedules.
What affects the calendar
- Inspection requirements in your jurisdiction
- Roof complexity and material lead times
- Storm seasons that increase claim volume
- Any upgrades planned during reinstallation
Plan your removal date close to the roofing start so panels spend minimal time off the roof. Good coordination avoids production downtime and keeps crane or lift rentals efficient.
Costs and Price Factors
People often ask how pricing works for solar panel removal and reinstallation. The cost is driven by labor hours, access, roof material, total panel count, and any new hardware that should be used to keep the system safe and watertight for many years.
Typical range
In many Florida style projects a practical range is one hundred fifty to three hundred dollars per panel for removal and reinstallation. Tile and complex metal profiles are higher because they need more staging and precise sealing. Travel, lift rentals, and steep pitches add time. When insurance covers the roof work, the detach and reset labor is often included as a necessary step for the roof replacement. Upgrades are separate and elective.
What is included
- Site protection and safety setup
- Removal and staging of panels and rails where required
- Fresh flashing and bases as needed for best practice
- Reinstallation, torque checks, bonding and grounding verification
- Commissioning and monitoring verification
- Photo documentation of all stages
What changes the price
- Panel count and roof layout across multiple planes
- Fragile tiles, stucco walls, or long conduit runs that need care
- Rail less systems that need precise layout and height control
- Hardware replacement such as clamps, end caps, splices, and bonding plates
- Upgrades such as batteries, new inverters, or extra panels
Ask for a written scope that lists labor and parts separately. Clear scopes help insurance adjusters, protect warranties, and keep your final invoice transparent.
Insurance and Storm Claims
Storms create roof damage. When the roof is approved for replacement, most carriers include the reasonable and necessary labor to detach and reset panels. This pays for the labor required to allow the roof work to proceed. It does not cover elective upgrades or fixing prior unrelated solar defects.
How to speed up claim approval
- Share your claim number and adjuster contact with your solar contractor
- Provide the roofer scope and photos so all trades are aligned
- Request that detach and reset is written clearly into the claim
- Keep all panel and equipment serial numbers documented before and after
Coordinated communication avoids back and forth later. It also proves that the work followed best practice, which protects your claim and your warranties.
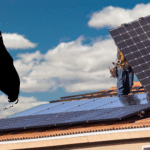
Roof Replacement Coordination
Order matters. Panels come off first. Roofing happens next. Reinstallation and testing complete the project. This protects the roof deck, keeps penetrations watertight, and avoids cable damage during shingle or tile removal.
What good coordination looks like
- Removal is scheduled close to roof tear off
- Roofers communicate when deck repairs are complete
- Reinstallation follows directly after dry in and surface installation
- Final sealing and torque checks are done on a clean dry surface
Some lenders allow a single loan that bundles roofing and the solar portion. This can simplify payments and speed decisions.
Licensing, Code, and Warranty Protection
Use a licensed and insured contractor. This is not a formality. It protects you in three ways. It keeps your equipment warranties valid. It ensures the work meets electrical and building code. It gives you recourse if anything goes wrong.
What to verify
- State license number and insurance certificate
- Experience with your roof material and your racking brand
- Photo evidence of prior detach and reset projects
- Understanding of brand rules for Tesla, Sunrun, and Enphase if applicable
Ask for torque specs and bonding confirmation in writing. This confirms the crew applied correct values and that the array is safely grounded and bonded to code.
Hardware, Rails, Clamps, and Monitoring
Good hardware choices and clean wire management determine long term reliability. When you reinstall, it is smart to refresh weather seals and replace any worn parts. The goal is a system that stays quiet, dry, and secure through wind, heat, and rain.
What should be inspected during reinstallation
- Flashing and base condition with correct fasteners and sealant
- Rail bonding and splice continuity
- Clamp integrity and end stop placement
- Wire clips and stand offs that keep conductors out of water channels
- Junction box covers, gasket condition, and drip loops
Monitoring and communication
After reinstallation the crew should verify your monitoring view. For microinverters each unit stays paired with its panel and position. For string systems optimizers should report expected voltage and current. Screenshots of production confirm that the array is online and healthy.
Roof Types and What They Change
Roof material changes mount selection, fastener choice, sealing detail, and labor time. Here is what to expect on common surfaces.
Asphalt shingle
Shingle roofs use flashed mounts with new lag screws and sealant every time panels come off. Reusing old seals is not a good idea. New flashing keeps water out and preserves your roofing warranty. Rails are leveled and bonded across planes so clamps grip correctly.
Concrete or clay tile
Tile roofs need care during removal and staging. Hooks or standoffs connect through the deck and underlayment. Extra tiles are staged for breakage replacement. Underlayment is the true waterproof layer so it must be intact. Tile profiles vary and affect hook selection and clearance height.
Standing seam metal
Standing seam systems use seam clamps that avoid penetrations when the profile allows it. Torque values are important. Over clamping can deform seams. Under clamping risks slip in wind. Check the rail height so panels clear ribs and allow airflow.
Screw down metal
Screw down roofs often need specific mounts with gaskets and sealant. Careful layout places mounts on structural members. Expansion and contraction patterns matter here so mounts and conductors need correct spacing and strain relief.
Low slope and specialty surfaces
Low slope roofs sometimes use ballast or special mounts. Water flow paths and membrane protection are the priorities. On these surfaces wire management and foot traffic control prevent long term damage.
Brand Specific Notes for Tesla, Sunrun, and Enphase
Tesla
Tesla requires approved or certified installers for work that touches its systems. The reinstallation should keep monitoring connected and should include photos of labeling and wiring. Rapid shutdown and gateway settings are verified before power up. Document serials and system status so records stay current.
Sunrun
Sunrun customers should notify support before removal and after reinstallation. This keeps account notes accurate and prevents gaps in monitoring or service coverage. Ask the crew for clear photos of the array and label plates for your records.
Enphase
Enphase microinverters must remain paired to the correct panels. Each serial on the map should match the physical layout. After reinstallation the installer should refresh the monitoring view and confirm that all units report normally with healthy voltage and current.
Relocating a System to a New Home
Relocation is possible. It takes planning. A site evaluation at the new property confirms structure, roof material, shade, and service panel capacity. Engineering updates the layout. New permits and interconnection documents are filed. Hardware often changes to match the new roof. Transport is scheduled to keep equipment safe. In many cases the economics favor leaving the system in place and adjusting the home sale price. When moving is the right choice, a licensed team coordinates every step.
DIY Risks and Safety Facts
Panels produce live power whenever there is light. Connectors and conductors can deliver harmful current even when the inverter is off. Lifting panels without training can crack glass and damage cells that later show up as hot spots. Walking across tiles without staging breaks the underlayment protection. A licensed contractor has the tools, labels, meters, and safety routines that prevent these problems. DIY risk is not worth the savings. It also risks warranty denial if something fails later.
Batteries, Inverter Choices, and Capacity Upgrades
Reinstallation time is an ideal moment to add new features. The crew is mobilized. Permits are open. The roof surface is fresh and clean. This makes add ons efficient.
Battery storage
Batteries add backup power during outages and improve self consumption. They can also enable time of use rate savings where available. A site check confirms where to place the battery for ventilation, clearances, and code. The interconnection and main panel capacity are reviewed before installation.
Inverter updates
Older inverters can be replaced with modern units that improve monitoring, add rapid shutdown features, or prepare your home for future expansion. Microinverter systems can add units on new panels with clear mapping.
Adding more panels
When your energy use grew due to a new family member, a home office, or an electric vehicle, this is the time to add panels. Your installer calculates capacity limits for strings, branch circuits, and service panels so the system remains within safe electrical limits.
Cleaning, Preventive Care, and Production Checks
A clean array performs better. During reinstallation crews wash panel glass and remove dust and residue. After that, most homes only need a gentle rinse from time to time. In dry areas a yearly professional cleaning can help. Production should be checked season to season with your monitoring app. Look for sudden changes that do not match weather or shade. Those changes can signal a loose connector or a failed device that needs a warranty service.
Photos, Documentation, and Handover Package
Good documentation saves time later. Ask for a handover package that includes:
- Before and after photos of the roof and array
- Panel layout map with serials for microinverters or optimizers
- Torque and bonding confirmation
- Copy of any permits and inspection sign offs
- Monitoring access and a screenshot that shows production
This package proves the work quality and helps insurance, warranty, and future service calls.
Working with a Local Team
Local teams understand city permits, inspector preferences, and regional weather. They know how tile breaks during cold mornings and how summer heat affects sealants. They coordinate with roofers in your area and keep schedules tight so your downtime is short. When you choose a team that works in your city every week, response time and communication are better from start to finish.
Frequently Asked Questions
- Does removing panels void the warranty
- No. When licensed and certified technicians perform solar panel removal and reinstallation, manufacturer and workmanship warranties remain valid. DIY or unlicensed work can void coverage.
- How long does the process take
- Removal is often one day. Roofing varies by scope. Reinstallation and testing usually take one day. Inspections and weather can affect this timeline. Many projects complete within one to two weeks door to door.
- Will insurance pay to remove and reinstall panels
- If roof damage is part of an approved claim, carriers typically include the labor to detach and reset panels so roof work can proceed. Upgrades are not included in claim coverage.
- Should I replace hardware during reinstallation
- It is wise to replace worn clamps, end caps, and weather seals. Fresh flashing and correct fasteners are key to a dry roof for many years.
- Can I add batteries or more panels during this work
- Yes. Reinstallation time is ideal for batteries and expansion because the crew, permits, and layout work are already in place.
- What happens if my monitoring does not show data after reinstallation
- Contact your installer. They will verify network settings, device pairing, and inverter status. In most cases the fix is quick.
Free Quote and Next Steps
If you are planning roof work, an insurance claim, or an upgrade, we are ready to help. Send your address and a few roof photos. We will confirm panel count, roof type, parts needed, and provide a clear written quote. We can also coordinate directly with your roofer and adjuster so your project stays simple and smooth from the first call to the final inspection.